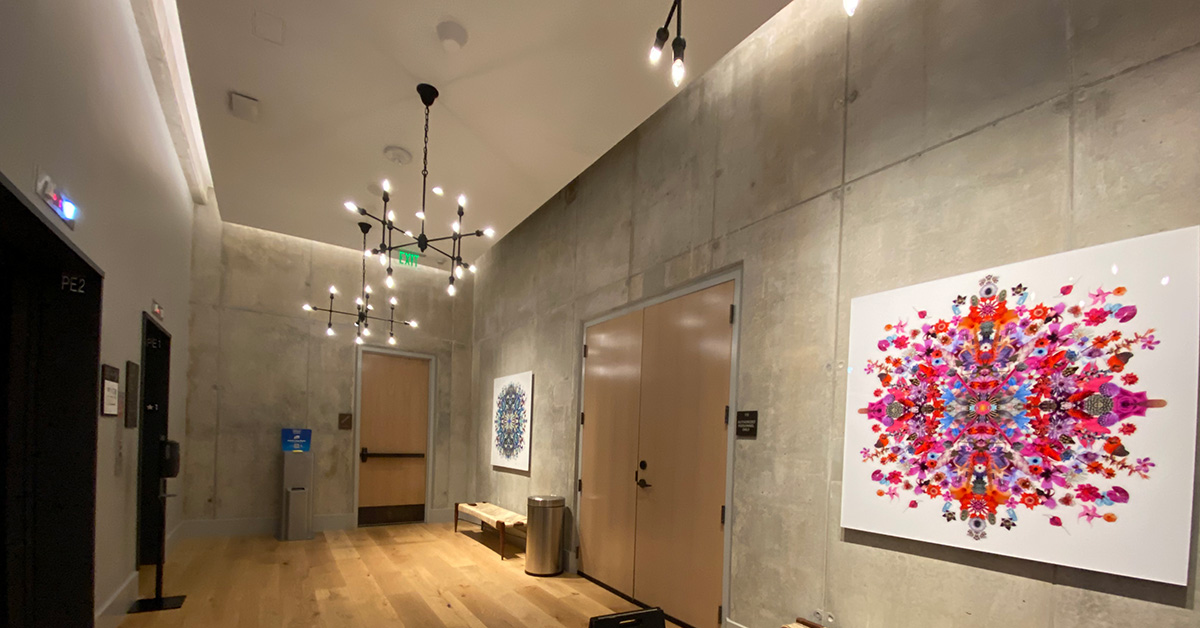
Artwork is meant to be illuminated. Art evokes the most emotion in any space, which is why we lighting designers want all eyes on it. Lighting designers talk about defining the visual hierarchy (the order we want users to view each element in space) because our eyes draw to the brightest spot. So, with proper illumination and dimming systems, lighting designers can naturally bring someone’s gaze toward a showcase-worthy work of art.


Remember The Big Three of lighting: ambient, focal, and sparkle. The balance of those three elements creates different emotions in space. Focal light is usually the best way to light artwork, unless the illuminated object has some sparkle like glass or diamonds. In that case, lighting those objects requires both focal and sparkle.
Lighting design uses footcandles to measure the intensity and reach of light. Artwork and other important items should be lighted at a ratio of 10 footcandles to 1 (at least over the ambient lighting levels.) For example, if the ambient light level is 20 footcandles, we would want 200 footcandles or more on the object we want to attract your attention to first. The lighting designer views the focal by the points method of calculation to determine the illumination level on an object or piece of artwork. The formula is as follows:
E=I/d^2*cos(angle)

Using the proper illumination levels on flat artwork found on a wall will mitigate several typical issues such as:
- Reflected Glare
- Frame shadow
- Excess spill on wall surfaces
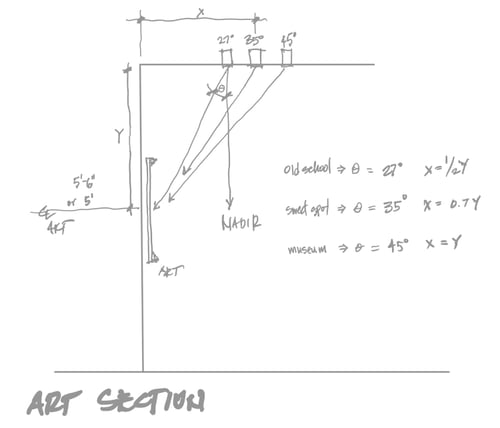
To minimize glare, the industry standard is for a lighting fixture is to be mounted at a 30° angle above a piece of art. This will help the reflection from the glass point towards the floor and not into the viewers' eyes. TIP: Remember, on a glossy surface, the angle of incidence equals the angle of reflection. That will only pose an issue if the artwork is hung too high and the viewer must look up at the artwork. For most ceiling heights, the standard for artwork height is 5’-6" from the centerline of the artwork from the floor. If you have extremely high ceilings or are hanging artwork over a fireplace or a bed, that convention must be reevaluated. For this discussion, let's keep the focus on the art that hangs at 5’-6" to the centerline.
Though the convention says 30 degrees, it doesn't have to be followed to a T. Economical, recessed, adjustable fixtures have a maximum angle of 30 degrees, but for some art, the height of the pattern on the wall can be excessive. Museum designers who use track fixtures will typically use a 45-degree angle so the height of the beam is not as tall on the wall. High-quality, recessed, adjustable fixtures will aim to 40 or 45 degrees maximum tilt, providing a rounder beam pattern on the wall. When determining the proper set back distance from the wall, aim for 35 degrees .
To locate fixtures properly for artwork, lighting designers consider several factors:
- The fixture setback distance from the wall to which the art is mounted
- The spacing between fixtures
- The number of fixtures to use
Are you thrilled at the idea of applying the trigonometry you learned in high school? Or perhaps you’d like to get a pencil, paper, and a protractor to figure it out. Or, for all you CAD junkies out there, you could draw your 35° from 5’-6" on the wall, then measure your setback. For the rest of us that want a faster, no tool convention, we apply a simple formula: For a 35° aiming angle, the setback distance will be 0.7 times the distance from the centerline of the art to the ceiling.
If you remember the 0.7 rule and you use quality fixtures that aim to at least 40°, then you've got the setback covered.
For the distance between the fixtures on one piece of artwork, there are several considerations:
- Whether it is commercial or residential construction.
- How close the artwork is to the ceiling.
- How important the art is.
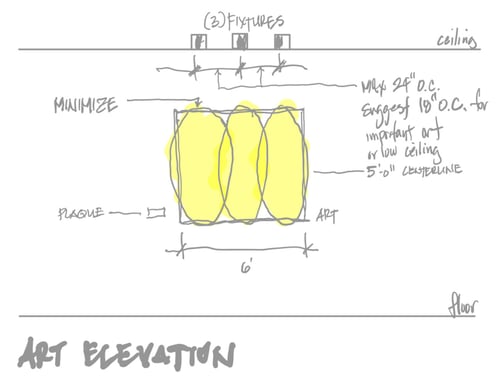
With residential construction, you may have limited spacing choices depending on the layout of the joists. If the joists are parallel to the wall, you can choose your spacing, but if the joists are perpendicular to the wall you are lighting, you will be limited to the spacing of the joists (in most cases that means 16 inches on center.) In commercial construction, you can usually choose your on-center spacing, and therefore for the most important pieces of art, you may place fixtures 18 inches on-center or for other pieces of art, 24 inches on-center.
If the ceilings are low and the art might come close to the ceiling, you may choose a tighter spacing, such as 16 inches or 18 inches on-center. Otherwise, the 24-inch spacing should work.
If the artwork is museum-quality, add another fixture or two to create a tighter space between them. This will lead to better lighting distribution on the artwork.
Once you have determined the setback and the on-center spacing, all you need is the artwork's width to determine how many fixtures you need. For some designers, an odd number of fixtures is more pleasing than an even number. However, if you cannot center the fixtures on the artwork, an even number of fixtures is the best choice so the lighting at least appears aligned.
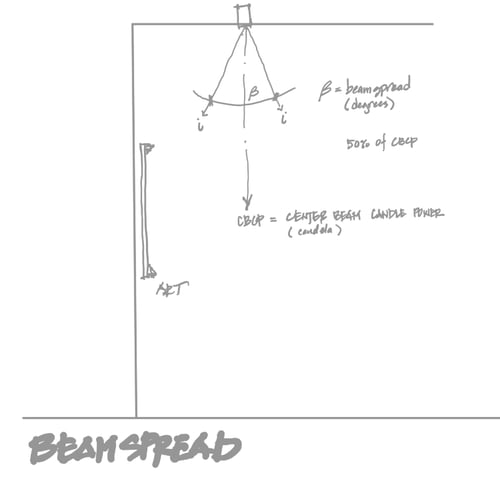
Finally, determine the beam spread of each fixture to get an even coverage of light across the art with a minimal light spill on the wall. Museum designers like to spill onto the wall a bit more than others because there is typically a name plaque adjacent to the piece on the wall. For most other applications, keep as much light on the artwork as possible. A designer will choose the proper beam spread for each lighting instrument (or fixture), ranging from 7 degrees to 45 degrees. The beam spread for the quality fixtures can be changed in the field without changing the fixture. This quality allows the lighting pattern on the wall to be tailored to the piece of art. The most common spread is approximately 25 degrees. Usually, lighting instruments have set beam spreads that may jump from 25 to 35 degrees, and upon occasion, the art may require a 30-degree beam spread for optimal aesthetics. In that instance, use a softening lens to increase a 25-degree beam to approximately 30 degrees.
These suggestions will help you determine how you should light your artwork for 90% of common applications. There are always challenges, such as sloped ceilings and non-standard conditions requiring further analysis to preserve the 35-degree aiming angle. But if you do preserve the ideal angle and choose the beam spreads wisely, you will be successful.
Stay up-to-date on the latest design trends. Download the Top 10 Trends in Architectural Lighting Design guide.